Get an edge over your opponents in one of Tarkov’s most challenging maps using our EFT Labs map guide!
The first time I loaded into Labs, it felt like I’d entered Tarkov’s version of a high-stakes vault heist. You don’t just spawn and loot, you’re signing up for chaos. I remember hearing footsteps echo down the hall, Raiders yelling something in Russian, and within seconds, my screen went black. No warning, no mercy. That’s Labs for you.
Over time, though, I fell in love with the risk. There’s nothing quite like running into a juiced squad, surviving with just 2 HP left, and making it out with millions in gear. If you want that experience too, then this EFT Labs Map Guide is your golden ticket. I’ll walk you through the layout, loot, extracts, Raider behavior, and what’s helped me stay alive (well, most of the time).
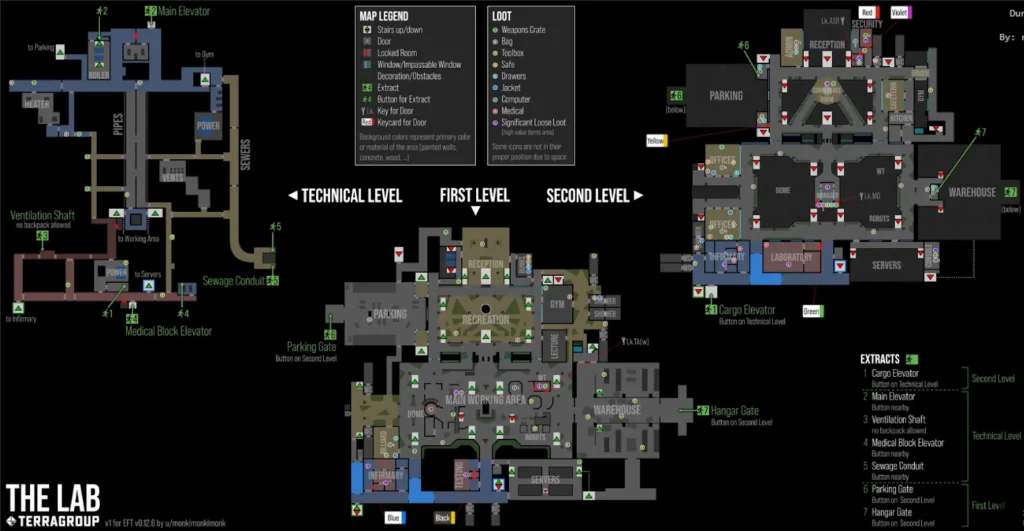
EFT Labs Map Guide: Spawns and Map Layout
The EFT Labs Map is symmetrical but deceptively complex. You’ll find yourself spawning in one of the outer corridors or labs, usually just far enough to hear gunfire within seconds.
- Central Area: This is the hotspot where most PvP happens. It’s loud, open, and dangerous.
- Dark Offices, Testing Labs, and Medical Rooms: These rooms are stacked around the edges of the map and often contain high-value loot.
- Verticality: Labs have multiple levels, such as elevators, staircases, and basement tunnels. Knowing how they connect is crucial for flanking or escaping.
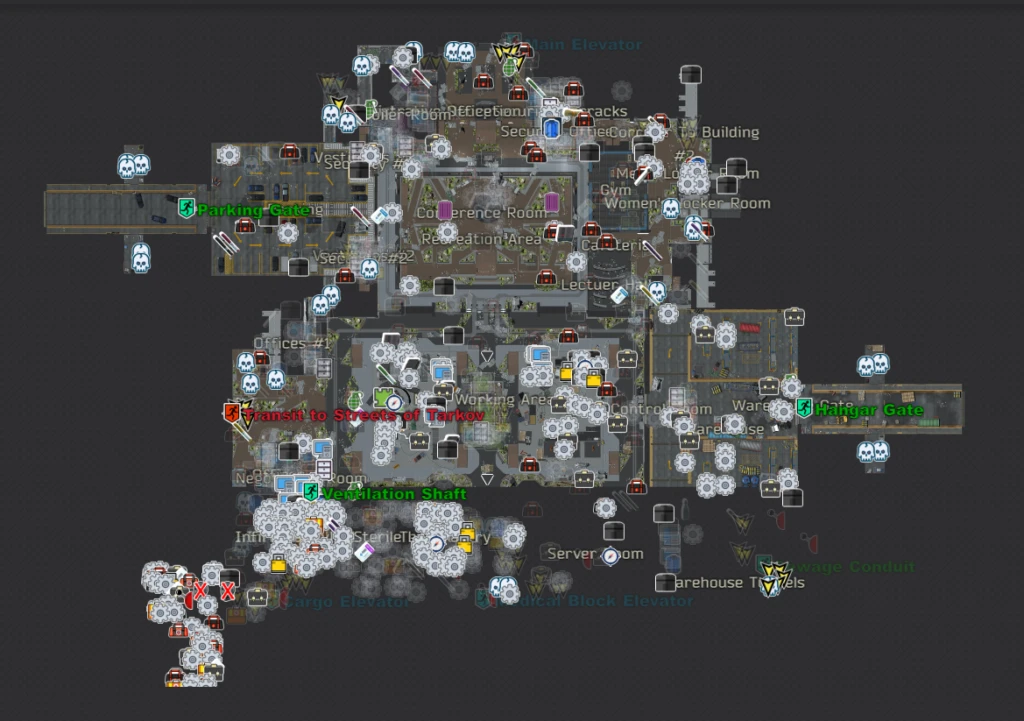
Labs Major Loot Locations
Green Keycard Room
Green Room is what most players sprint toward as soon as the raid starts, and for good reason. It’s a treasure chest for medical items and high-value barter loot.
Inside, you’ll find:
- Two LedX spawn locations (on the shelves and the metal desk)
- Intel folders, injectors like MULE, Adrenaline, and P22
- Loose stims, golden stars, and rare items like ophthalmoscopes
This room often decides if a raid’s profitable or not. If I get in early, I loot fast, prioritize injectors and LedX, and stash them in my injector case.
Dark Offices
Located near the edge of the map, Dark Offices is one of my favorite low-key money makers. It doesn’t require a key and rarely draws attention early in the raid, making it perfect for quiet looting.
Here’s what to expect:
- 8 to 10 computers (good GPU and SSD spawn rates)
- 2 safes with rubles, bitcoin, and rare barter items
- 1–2 Intel folder spawns
It’s a solid route for pistol runners and low-risk players looking to earn without constant gunfights. Plus, the noise from electronics helps mask your footsteps.
Weapon Testing Area
This area is located near the bottom floor and tends to fly under the radar compared to other hotspots. It’s great for gathering late-game gear or even prepping for a fight against Raiders.
Loot highlights include:
- Large weapon crates with modded M4s or HKs
- Ammo boxes with rare rounds like M995, BS, or 7N39
- Loose attachments and scopes
I often hit this room mid-raid after the early bloodbath calms down. It’s also near multiple flanking paths, which makes it a good spot to stage for PvP while picking up loot on the way.
Black Keycard Room
This one’s the crown jewel. The Black Keycard Room is basically a condensed version of a Labs jackpot. If you’ve got access to it, you’re looking at one of the best value-per-minute loot zones in the entire game.
Inside, expect:
- 10+ rare stim spawns (MULE, SJ6, AHF1-M, L1)
- 2–3 LedX spawn locations
- Loose ophthalmoscopes, LED lamps, and injectors
This room is rarely quiet. I only run Black Room when I’m confident my extract plan is secure, and I’m either solo with stealth or in a squad that can cover angles while looting.
Yellow Keycard Room
Yellow Room often gets overshadowed, but I treat it as a two-for-one deal: loot and utility. Not only does it contain decent loot, but it also lets you activate the stealth extract option for Parking Gate.
Loot here includes:
- Intel folders and GP coins
- A graphics card spawn on the shelves
- Loose stims and tech spawns
Flipping the Parking switch from Yellow Room is one of the most underrated tactics in Labs. It lets you extract quietly without drawing Raiders, and when you’re full of loot, that’s a literal lifesaver.
Extraction Points
Cargo Elevator
This is one of my go-to extracts when I’m trying to avoid PvP at the end.
- Located in the basement near the tunnels
- Activating it doesn’t always spawn Raiders (but still stay sharp)
- Quiet and quick to reach from Medical Wing or Dark Offices
Medical Block Elevator
This one’s more high-risk but great for fast exits near the medical side.
- Close to Black Room and surgery area
- Spawns Raiders fairly often
- Tunnels offer escape routes to flank or fall back
Main Elevator
Classic choice, and often a PvP magnet.
- You need to activate the generator room first
- Can be fast, but everyone knows about it
- Best used when you’re confident and armored
Hanger Gate
- Loudest extract by far
- Guarantees Raider spawn
- High visibility = high risk
If I’m juiced and with a squad, this can work, but solo? I avoid it unless it’s my only option.
Parking Gate
Stealth-friendly, if you flip the switch in the Yellow Room.
- Long hallway and open doors = ambush potential
- Flip the switch to avoid Raider spawns
- Great for avoiding fights while heavy
Sewage Conduit
- Backpack and weaponless extract
- Good for insurance runs, tasks, or when ratting
When I’m just grabbing LedX for quests or hoarding injectors, this is the ninja way out.
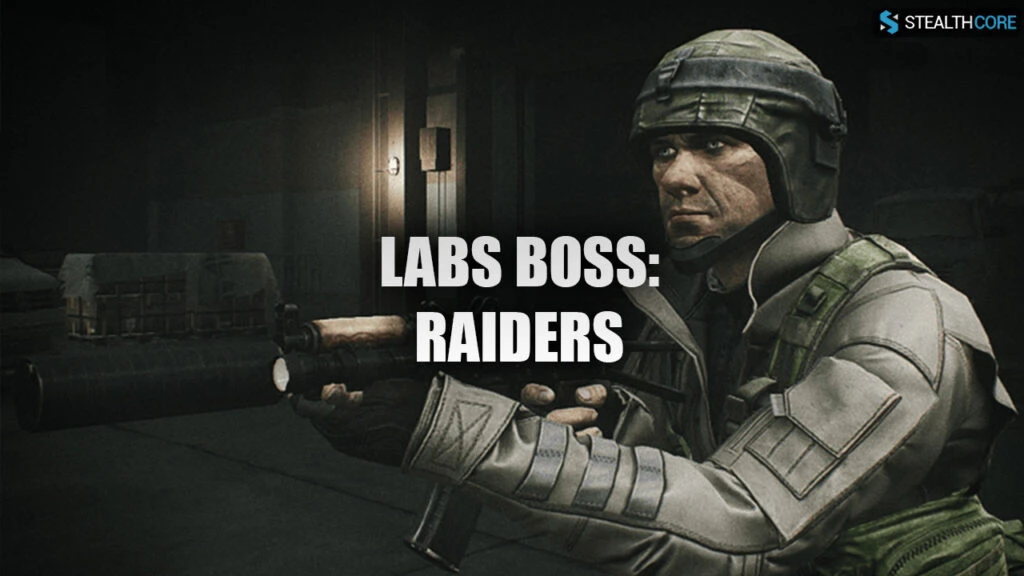
Raiders: The Labs Bosses
Labs doesn’t have a boss, but Raiders might as well be. These AI enemies are smart, brutal, and terrifyingly fast. They’re designed to simulate top-tier PMCs, and sometimes they do it too well.
Expect them to:
- Flank aggressively and push through cover
- Throw grenades with scary accuracy
- Use ammo like M995, M61, or BS rounds
- Drop loot worth 500k–1M depending on their gear
When you activate an extract or press a button, listen for their voice lines. They give away their location, and whether you’re about to be flanked. I always flashbang first, then push wide and clean. Don’t let them group up on you.
Conclusion
The EFT Labs Map is a beast, having high stakes, high loot, and high danger. But once you learn the routes, key loot zones, and extract strategies, it becomes one of the most rewarding places in Tarkov.
So, if farming stims, chasing LedX, or out-PvPing, this guide should help you survive just a bit longer and maybe even thrive. Just don’t get greedy. Labs punishes greed harder than any map in the game.