Finding the best PostFX settings in Tarkov can dramatically change how you perceive enemies, loot, and the overall environment.
Optimizing my visuals gives me a tactical advantage whenever I’m dealing with foggy Woods mornings or the blinding lights of Interchange. The game’s default look often feels dull or overly bright, making it harder to spot movement or distinguish silhouettes.
Many players overlook just how impactful tweaks can be. From brightness controls to sharpening filters, dialing in the best postFX settings in Tarkov lets you see more, faster, and with less strain.
In this guide, I’ll break down the categories that matter, based on in-game experimentation and community consensus.
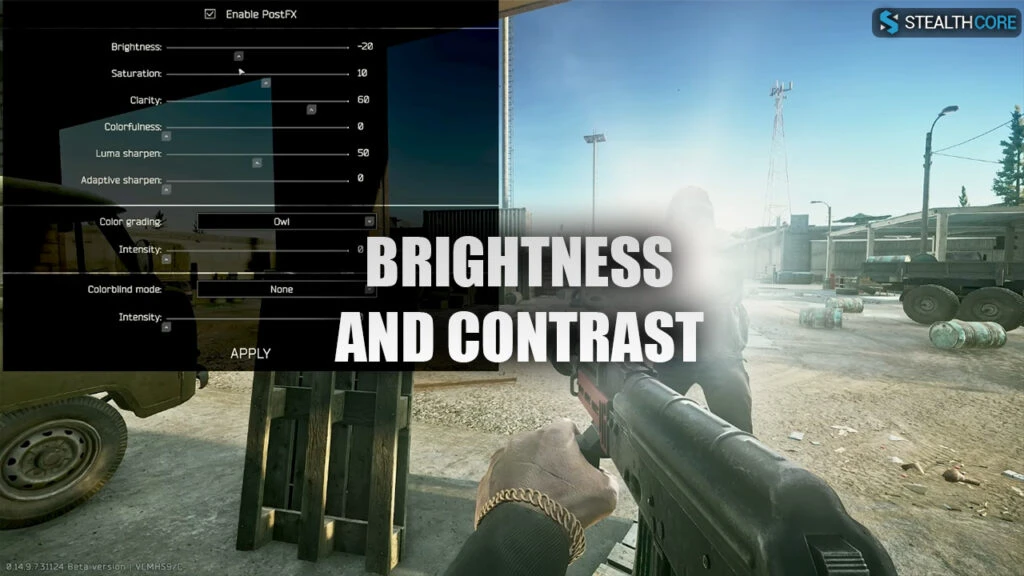
Brightness and Contrast
One of the key visual elements you’ll want to start with is brightness. I always begin with this, especially after BSG’s changes that made night raids visually tougher. Negative values in brightness can drastically enhance definition.
- I keep Brightness at -20 on my setup. It helps counter the blinding flashlight meta and also works great with NVGs.
- If it gets too dark, I simply tweak the Gamma and Contrast through my NVIDIA Control Panel.
Contrast, though not directly part of postFX in-game, plays a vital role when adjusted via your monitor or GPU control panel. It helps balance what the brightness setting reduces.
Key tip: Adjust these settings in-game first, then refine through GPU software.
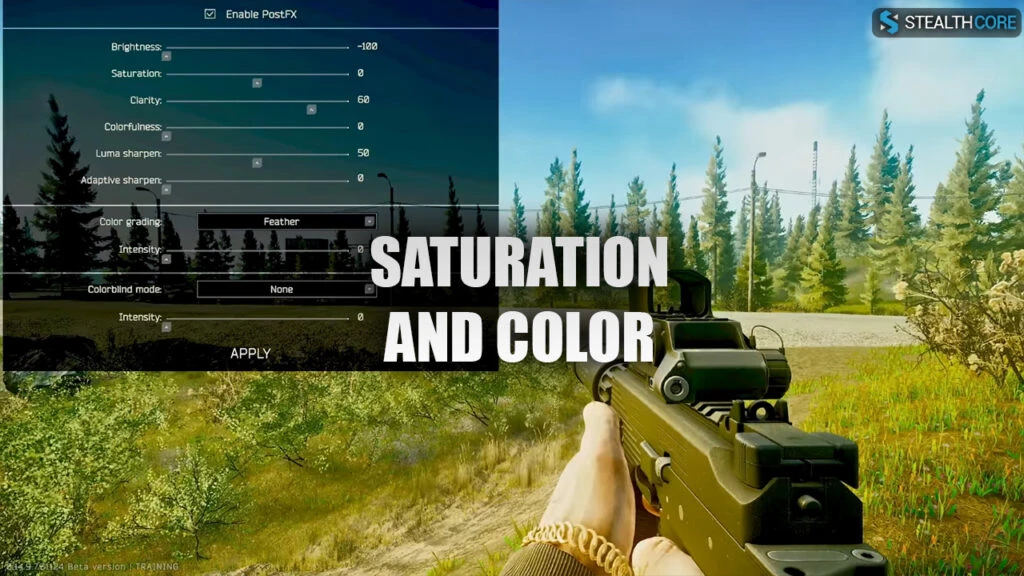
Saturation and Colorfulness
The second most misunderstood setting is Saturation. Less is more here.
- I keep Saturation at 25 max.
- Anything higher than 10 can mess with how the game renders, especially in foggy or forested maps.
To counterbalance any washed-out appearance:
- Use Digital Vibrance in NVIDIA settings or increase the color on your monitor directly.
- I avoid touching Colorfulness in-game, it tends to distort natural lighting. If I had to touch it, I’d keep it below 60.
One time on Interchange, I maxed out colorfulness to test visibility, it looked like a neon rave and my shots were off all game. Lesson learned.
Clarity, Luma Sharpen, and Adaptive Sharpen
Now we’re getting to the juicy part. Clarity and Sharpening options massively improve visibility, especially in foggy weather or dark corners.
- Clarity at 100: This helps objects pop and adds depth, particularly in long-range engagements. I noticed a difference during Woods sniper missions, bush campers were easier to spot.
- Luma Sharpen at 100: This outlines light-exposed surfaces and reduces flashlight bloom.
- Adaptive Sharpen at 20: Test this carefully. It makes edges crisp but can tank your recording quality.
If you play without recording footage, you may even push adaptive sharpening higher. But personally, I like keeping my visuals clean.
Color Grading
I don’t always use color grading, but when I do it’s usually Clifton.
- Clifton at 65 Intensity: This gives a richer dynamic range, enhancing dark zones while adding brightness to lit areas.
It’s also great for balancing Tarkov’s notoriously inconsistent map lighting. I remember trying out Clifton during a Customs night raid. It helped bring out just enough detail without making everything overly glossy.
Other players also recommend experimenting with different filters like Tarkov’s own “Tronopia” (color blind mode) if you want greener grass or distinct enemy outlines, but I personally leave that off.
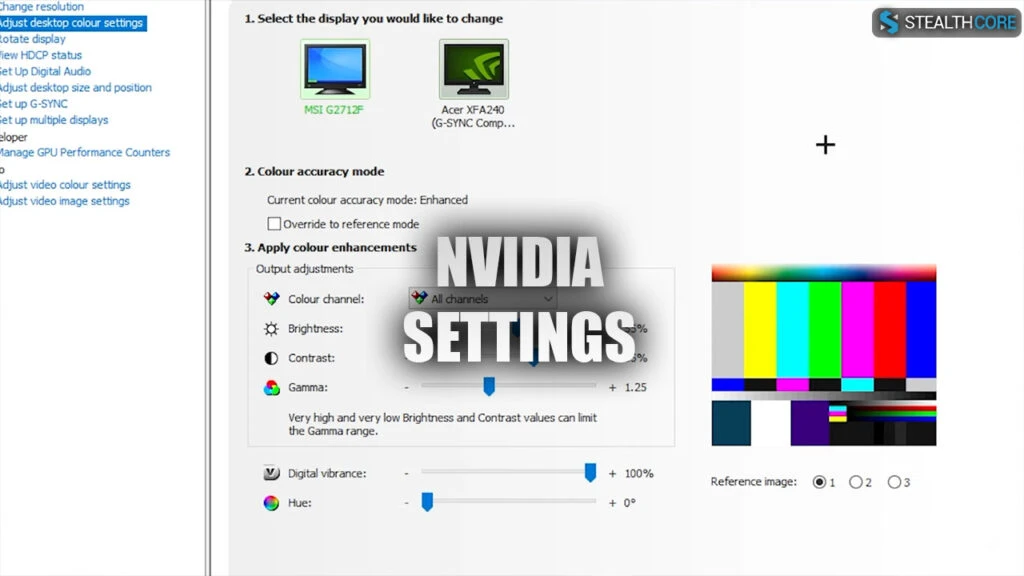
The NVIDIA Control Panel and Monitor Adjustments
Sometimes, in-game settings aren’t enough. That’s when the NVIDIA Control Panel becomes your best friend.
Here’s how I set mine:
- Digital Vibrance: Maxed out.
- Gamma and Contrast: Slightly raised for better night visibility.
- Program Settings: Make sure Tarkov is set to use your GPU over integrated graphics, and everything is optimized for performance.
I noticed a 10–15 FPS gain just by setting my preferred GPU as the default in Program Settings. It also gave a smoother visual experience, especially in large maps like Streets of Tarkov.
AMD users will need to replicate this using Radeon Software. The logic is the same: enhance via the GPU, not just in-game.
Settings for Day vs. Night Raids
Yes, your best postFX settings in Tarkov will differ based on time of day. I run two quick adjustments depending on the raid type:
Day Raid:
- Brightness: -20
- Saturation: 25
- Clarity: 100
- Clifton: ON (intensity 65)
Night Raid:
- Increase Gamma via NVIDIA settings.
- Sometimes increase Clarity and reduce Brightness slightly more.
- No color grading, as it tends to blow out NVG contrast.
One time, I forgot to switch back to my day settings after a night raid. I loaded into the Factory and everything looked like it was dipped in mud. Having a quick reference or even a preset on your monitor is a real lifesaver.
General Tips and Things to Avoid
- Avoid high color values: Over-saturation might feel “vibrant,” but it destroys shadows and depth.
- Don’t copy settings blindly: Always test on YOUR monitor. What looks good on a 1440p IPS may not work on a 1080p TN panel.
- Beware of too much sharpening: It might make your game look “crisp,” but it can strain your eyes over long sessions.
- Recalibrate every wipe or update: BSG constantly tweaks lighting, fog behavior, and shadow rendering. What worked two patches ago may look awful now.
Conclusion
Optimizing the best postFX settings in Tarkov is all about striking a visual balance that enhances clarity, preserves realism, and reduces distractions.
With the right combination of sharpening, saturation, and external GPU tweaks, your surroundings become clearer and enemies easier to spot. So, if you’re running night raids or clearing daylight hotspots, these adjustments can give you a cleaner, more competitive edge.
Test frequently, adjust as needed, and let your settings work with you, not against you.